About Me

Thursday, August 11, 2011

Export to Excel in C#. CSV format.

Very often, I receive requests to export some data into Excel.
Most of time its just plain table of values that have text or numeric columns.
At the beginning I tried different libraries that can create Excel documents with the data.
After that I found the CSV format.
Its really easy. All you need is to write values row by row into the text file and separate each column by coma.
Then Excel or Open Office will easily parses your text file and opens it without any problem.
You should no more worry neither about a library or version of the Excel - CSV is very easy to build and use:
		public byte[] BuildSpreadsheetVersionOfReport()
		{
			int totalRecords;

			List reports = BrowseReports();

			StringBuilder bld = new StringBuilder();

			bld.AppendLine("Event Id, Submitted Date/Time, Contracted Manufacturer, Status, Status Date/Time, Partner");

			foreach (ManufacturerReport report in reports)
			{
				bld.AppendFormat("{0},{1},{2},{3},{4},{5}\r\n", 
					report.EventId, 
					report.SubmittedDate, 
					report.ManufacturerName.GetCSVEncodedValue(), 
					report.Status.ToString().GetCSVEncodedValue(), 
					report.ReportAudit.EventDate, 
					report.Partner.Code.GetCSVEncodedValue());
			}

			return Encoding.ASCII.GetBytes(bld.ToString());
		}

As you may see, everything is simple. I'm just using a StringBuilder to build a list of rows with values.

However, there are two important things!

1. According to a CSV format description, there are few characters like comma, newline or double quote that's reserved for the format. So, if your report has that values, you should enclose them in double quote.
That's why I'm using GetCSVEncodedValue() extension method for some of my text values where reserved characters may appear :
		public static string GetCSVEncodedValue(this string val)
		{
			if (string.IsNullOrEmpty(val))
				return "\"\"";

			val = val.Replace("\"", "\"\"");

			if (val.Any(f => new[] { ',', '\"' }.Contains(f))
				|| val.IndexOf(Environment.NewLine) != -1
				|| val.StartsWith(" ")
				|| val.EndsWith(" "))
				return String.Format("\"{0}\"", val);

			return val;
		}

2. The second important thing is also relates to enclosing special characters with adouble quotes.
Compare two strings that's using as a templates in a String.Format for building each row of data:
bld.AppendFormat("{0},{1},{2},{3},{4},{5}\r\n",.....
and
bld.AppendFormat("{0}, {1}, {2}, {3}, {4}, {5}\r\n",.....
As you may see, in the second example there is a space between a comma and a value. Since we enclosing the string with a double quote, the results will be as following
"Value1","Value2, and a special character","Value3 \r\n"....
and
"Value1", "Value2, and a special character", "Value3 \r\n"....
The important thing is that second example will not work. Excel, as well as Open Office treats enclosing with a double quote only if the double guote starts right after the comma that delimits one value from another. As you may see, there is a space between a comma and a first double qoute.
This will cause that the end the file will be broken and can't be recognized correctly.

At the end its very easy to use generated content and return it to the customer as a CSV file (ASP.NET MVC code):
		public ActionResult CsvExport(OrderByInfo orderByInfo, ReportFilter filter)
		{
			return File(
				distributionReportManager.BuildSpreadsheetVersionOfReport(),
								"text/csv", 
								"ExportFile.csv");
		}

Wednesday, August 10, 2011

Convert enum to a custom string

Enums are really usefull.
I'm using them in each application.
The primary benefit of using enum is that it makes your code more readable.
If you have variables that should has only strict number of values, then enums is really what you should use.
For example, if you have class that describing a person, its always better to have a property containing Gender.Male or Gender.Female then using just a string  "Male" or number "1" meaning that this is male and "0" for female.
Its not a problem even if you have dozen values, like age kinds:

public enum Age
{
  Unknown,
  Infant,
  Child,
  Adolescent,
  Adult,
  MatureAdult,
  OlderAdult,
  AgedAdult,
  Neonate
 }

If you are using enum you will be always sure that the code will not compile if you make a typo and type "Chaild" instead of "Child".
Its also much easy to add new states to the list when you need it.
In other words you are keep control all possible values that your variable may has. At the same time, the value  of the variable is looking friendly and well readable.

One of the problem with this approach is to show custom text that should be associated with the Enum value.

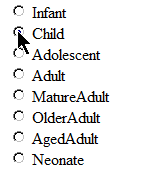
For instance, you want to build optional list that contains all possible values of the Age enum:
As you may see, the list looks ugly because the text is not readable at all. Also, you may want to describe each state and specify which age range is for each option so the user will be easy to select proper value :

To build such select list you should create a relation between the enum value and custom text value:

ASP.NET MVC Controller code:
public ActionResult Index()
        {
         Array values = Enum.GetValues(typeof(Age));
   List<KeyValuePair<string,string>> enumValues = new List<KeyValuePair<string, string>>();
         
   foreach (int value in values)
   {
    string text = string.Empty;
          switch ((Age)value)
          {
           case Age.Unknown:
            text = "Unknown";
            break;
           case Age.Infant:
            text = "Infant (>28 days<1 year)";
            break;
           case Age.Child:
      text = "Child (1-12 years)";
            break;
           case Age.Adolescent:
      text = "Adolescent (13-17 years)";
            break;
           case Age.Adult:
      text = "Adult (18-64 years)";
            break;
           case Age.MatureAdult:
      text = "Mature Adult (65-74 years)";
            break;
           case Age.OlderAdult:
      text = "Older Adult (75-84 years)";
            break;
           case Age.AgedAdult:
      text = "Aged Adult (>85 years)";
            break;
           case Age.Neonate:
      text = "Neonate (0-28 days)";
            break;
           default:
            throw new ArgumentOutOfRangeException();
          }
          
    enumValues.Add(new KeyValuePair<string, string>(text,value.ToString()));
         }
         
   ViewData["Ages"] = enumValues;
            
   return View();
        }

ASP.NET MVC View code:
<body>
    <% foreach (KeyValuePair<string,string> enumValue in (IEnumerable<KeyValuePair<string, string>>) ViewData["Ages"])
    { %>
      <%= Html.RadioButton(enumValue.Key, enumValue.Value)%>  
      <%= Html.Label(enumValue.Key, enumValue.Key)%> <br />
    <%
    } 
    %>
</body>

As you may see to build such relation, you should reserve some place in your code to have all this friendly strings and remember where this place is locating.
If you going to use it again, you should either copy/paste the same text or move it to the some class.
Both ways are not good because you and other developers of your project should always remember where is the place where the text can be changed.
Its great that there is a solution that allows to have custom text in the same place where you have Enum definition. You should use an attribute System.ComponentModel.DescriptionAttribute 
The attribute allows to specify any text as description for each enum element:
public enum Age
 {
  Unknown,
[Description("Infant (>28 days<1 year)")]
  Infant,
[Description("Child (1-12 years)")]
  Child,

  [Description("Adolescent (13-17 years)")]
  Adolescent,

  [Description("Adult (18-64 years)")]
  Adult,

  [Description("Mature Adult (65-74 years)")]
  MatureAdult,

  [Description("Older Adult (75-84 years)")]
  OlderAdult,

  [Description("Aged Adult (>85 years)")]
  AgedAdult,

  [Description("Neonate (0-28 days)")]
  Neonate
 }

When Enum is defined like above, its easy to get those custom text values with simple extender that's using reflection:

public static class EnumExtender
 {
  public static string GetDescription(this Enum en)
  {
   return GetDescription(en.GetType(), en.ToString());
  }

  public static string GetDescription(Type enumType, Enum en)
  {
   return GetDescription(enumType, en.ToString());
  }

  public static string GetDescription(Type enumType, string name)
  {
   MemberInfo[] members = enumType.GetMember(name);
   if (members.Length > 0)
   {
    MemberInfo mi = members[0];
    object[] attrs = mi.GetCustomAttributes(typeof(DescriptionAttribute), false);

    if (attrs.Length == 1 && attrs[0] is DescriptionAttribute)
    {
     DescriptionAttribute attr = (DescriptionAttribute)attrs[0];
     return attr.Description;
    }
   }
   return name;
  }

 }

In this way the code that builds custom text looks much better :
public ActionResult Index()
        {
         Array values = Enum.GetValues(typeof(Age));
   List<KeyValuePair<string,string>> enumValues = new List<KeyValuePair<string, string>>();
         
   foreach (int value in values)
   {
    string customText = ((Age)value).GetDescription();
    string enumValue = value.ToString();
    KeyValuePair<string, string> keyValuePair = new KeyValuePair<string, string>(customText, enumValue);

    enumValues.Add(keyValuePair);
   }

         ViewData["Ages"] = enumValues;
            
   return View();
        }

Tuesday, May 24, 2011

Castle Windsor error : "Could not convert from ‘Class.Name, Assembly.Name, Version=x.x.x.x, Culture=x’ to System.Type – Maybe type could not be found"

Today I got this exception during my work under some part of code. My code used Castle Windsor as IoC container.
I used to realize that most of errors that coming from the Castle Windsor project are not user friendly.
Its difficult to understand where is the error. Fortunately, every time when I'm having such errors I'm starting looking for the reason from the configuration section. In all my cases, the problem was in there.

In the situation when Castle Windsor returns such error, try to do what I did:

  • Open Castle Windsor configuration 
  • Find configuration of  "Class.Name" that was in the exception
  • Make sure that there is an assembly "Assembly.Name" specified in the configuration line. The assembly should be in the scope of the application (usually, the assembly DLL file should be in the same directory)
  • Make sure that "Class.Name" has correct namespace at the beginning. 
  • Make sure that the "Class.Name" is locating in the assembly that was specified in the configuration line. You can use Reflector to open the Dll file and double check that the "Class.Name" is really there.
As you can see, there is nothing complex, just to pay attention to the configuration.

Friday, May 13, 2011

How to start and stop windows service during building the Visual Studio solution's project.

I have a Visual Studio solution that contains few projects. One of them is a windows service.
You may know how it might be frustrating to turn it off and during each build of the solution.
Today i had a lot of small fixes in the service. Each of them requires to be tested. So my service had to be turned off and on every time. Somewhere in the middle, I lost my patience and decided to make my life easier.

As you may know, each Visual Studio project file you are working on is actually a MSBuild script.
MSBuild is a great script language that can help you to automate things you usually do to compile and build your project. Also it can do a lot of other things. You can read a MSBuild reference about it.
Each time when you building the project, it makes Visual Studio to execute the script.
So, in our case, the obvious solution is to specify a commands that stops the service then makes a build and then starts it again. That commands should be added into YourProject.csproj file.

Unfortunately default MSBuild package of commands does not have one for managing services. But, there is a great library http://msbuildtasks.tigris.org that can do that. As you may see, there is a "ServiceController" task in the list of available commands in the list. That one the command we are going to use.
Download the MSBuild.Community.Tasks.msi package from the "Download the latest release section" of the same page and install it to your computer. The installer will create a directory with the library that contains the task we need - MSBuild.Community.Tasks.dll

The next step is to find the place where we can inject that commands. As I told above, that should be YourProject.csproj file. Open it with Notepad and find there two targets - BeforeBuild and AfterBuild


As you see,  they are empty and commented out.
You need to uncomment it and add calling of "ServiceController" commands:


<target name="BeforeBuild">
    <servicecontroller action="Stop" servicename="ServiceName"/>
</target>
<target name="AfterBuild">
    <servicecontroller action="Start" servicename="ServiceName"/>
</target>

If we try to build our project now, we may get an exception. That's because Visual Studio's MSBuild process does not know the command we specified. All we need to do is to add a reference to the MSBuild.Community.Tasks.dll library that  we downloaded and installed:

<usingtask assemblyfile="..\lib\MSBuild.Community.Tasks.dll" taskname="ServiceController"/>

You may add the "UsingTask" line right after project definition and specify a path to the library in the AssemblyFile attribute.
After that you can freely reload your project in the Visual Studio, compile your service and forget that horrible time when you had to stop and start after each build.

Monday, April 25, 2011

How to configure CruiseControl.NET server for building and deploying ASP.NET applications with NANT

  1. Cruise Control is able to automatically build the code once it was changed in the SVN. To be able to do that, you need to install SVN client on the server.
    Download and install Collabnet subversion command-line client for windows. The installation is simple.
    • Create empty directory in any desired place. For instance, create empty directory "C:\Work\MyWebAppSources". Its not important where the directory will be, in the root of the hard drive or in the subdirectory.
      Now you need to get the sources of the web project from the svn repository. Cruise Control is checking for updates automatically, but for the first time, the folder with the sources should be prepared manually.
    • Select "Start" -> "Run" and type "Cmd" to launch the comand window.
    • Type "cd C:\Work\MyWebAppSources" to enter inside newly created directory.
    • Type "svn checkout http://beanstalkapp.com/svn/MyWebApp" to get the sources from your online svn repository
      In this example I'm using the Beanstalk - online svn repository for everyone. Instead of my url, use the url of your repository.
    • Enter login and password to access to your repository.
    • Wait until all files will be checked out from the svn server.
  2. Once Cruise Control download recent updates, it need to build the source code, create dlls and copy them to the web directory. Cruise Control does not do  that by itself. Instead, it using one of the numerous build applications. In this example I'm using NANT. To be used, NANT is needed to be configured on the server.
    • Download NANT package from the server
    • Unfortunately it does not have an installer, so you should do that manually. Open the package and extract bin subfolder into the any desired location. For instance, you may create subdirectory in your Programm Files folder and put the files from the package into that directory - c:\Program Files\Nant
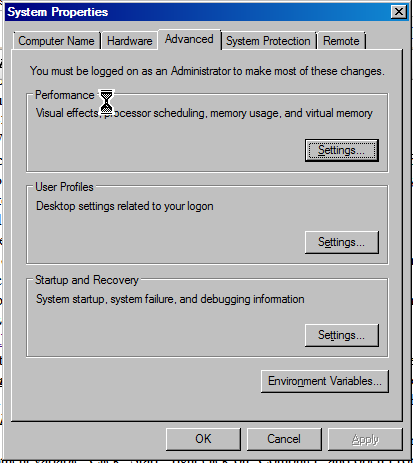
    • To make Nant be visible by Cruise Control its needed to add the path to Nant binaries to the PATH Environment variable. Click "Start", right click on "Computer" and open Properties window.
    • Select "Advanced system settings" task. As result System Properties window will be appeared:
    • Click on "Environment Variables..." button
    • Select PATH variable and click "Edit..." button
    • Type ";c:\Program Files\Nant" at the very end of the line

    • Click "Ok" to close "Edit User Variable" console and close properties window by clicking "Ok" buttons.
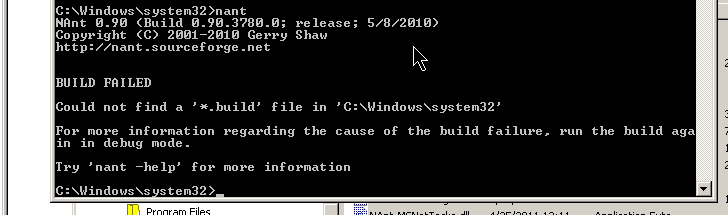
    • To make sure that NANT exectutables can be found from any place, select "Start" -> "Run", type "cmd". Type "Nant" in the command window that opened. The result should be like the one on the image.
    • The "Build Failed" message is ok in this case. It means that NANT can't find any *.build file to build the application, but, the Nant itself is accessible from any location (from c:\windows\system32\ in my case)  and can be accessed by Cruise Control .NET too.
  1. Now we need to make sure that NANT can build our web application and deploy it to the desired place. Special .build file should be placed into the root of your source files (C:\Work\MyWebAppSources in this case). That file contains an xml-based script, telling NANT how to build and where to deploy the application. Below is an example of simple NANT script that builds web application and deploy all important files into the location where web directory of the website is.


    • Create a file and name it as default.build at the C:\Work\MyWebAppSources location.
    • Put the script inside and save it.
    • Click "Start" -> "Run". Enter "Cmd".
    • Enter "cd C:\Work\MyWebAppSources"
    • Type "Nant default.build"
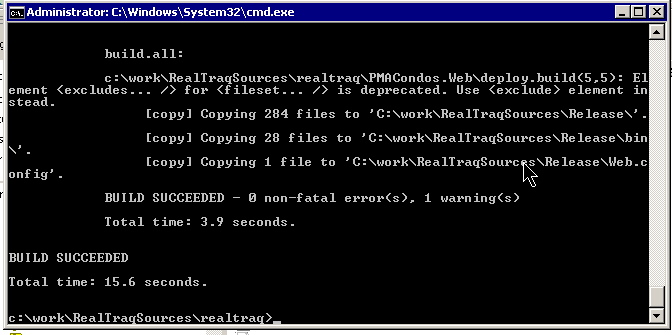
    • Make sure that the script is working properly, build the sources and the files are copying to the desired place. The image below shows successfull state of the script's excecution.


  1. Now after we did everything manually its time to automate our process with Cruise Control.NET.
    • Download an installation package of Cruise Control.NET
    • Install the package.
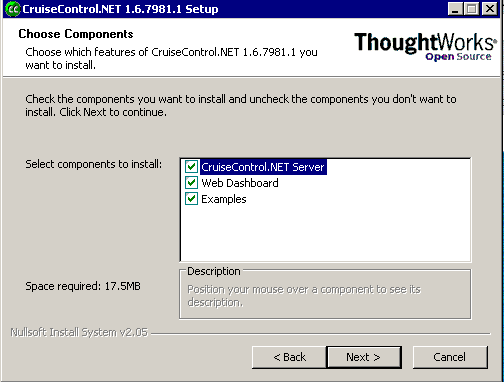
      During the installation, make sure that following items are selected


      • Make sure that the package will be installed successfully
      • Cruise Control. NET contains of two parts - a web application that in charge of managing of the build process and the windows service. The windows service is in charge of checking for updates and initiate build process if new updates arrived.
        To make the windows service "Cruise Control. NET" working, its needed to change its configuration file.
      • Open directory where your service was installed. In my case its "C:\Program Files (x86)\CruiseControl.NET\server
      • Edit the ccnet.config (make sure its exactly that file, not the ccnet.exe.config)
      • Put the following configuration inside
    
      
        http://localhost/ccnet
        10
     
      svn
      http://beanstalkapp.com/svn/MyWebApp
      C:\Work\MyWebAppSources
      MySVNUsername
      MySVNPassword
      true


            nant.exe
            C:\Work\MyWebAppSources
            default.build


              C:\dev\ccnet\ccnet\build\ccnet.exe-results.xml


            log


      • Below is short description of items in the file that should be changed
        • TrunkUrl contains the url of the SVN repository with the sources
        • WorkingDirectory and Basedirectory elements is the directory where files are building and where default.build NANT file is
        • Username and password is the credentials to access the SVN repository

      • Now, its time to start the windows service. 
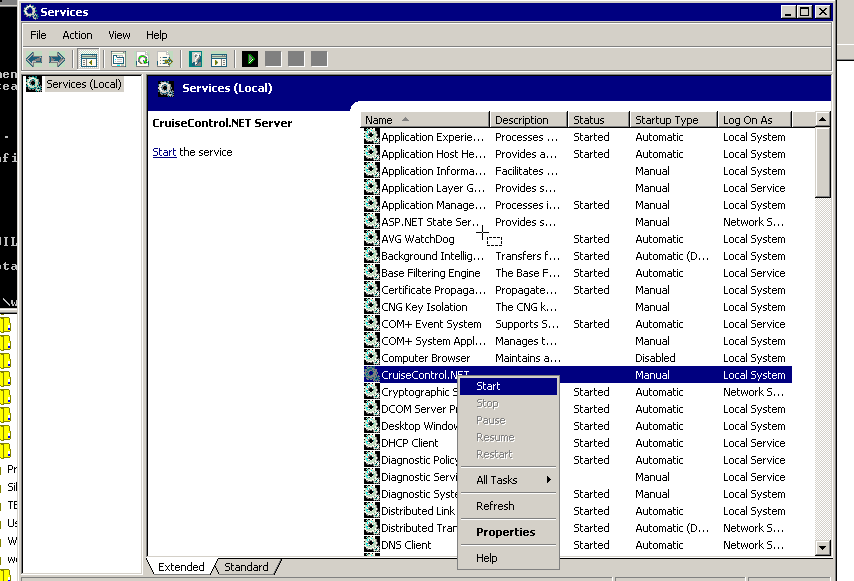
      • Click on "Start" -> "Run", enter "services.msc" to open the list of installed windows services
      • Find the "Cruise Control .NET" service and start it. 
      • By default, it configured to be launched manually every time when windows starts. You can change that property to "Automatic" and windows will start that service during each startup of the system.
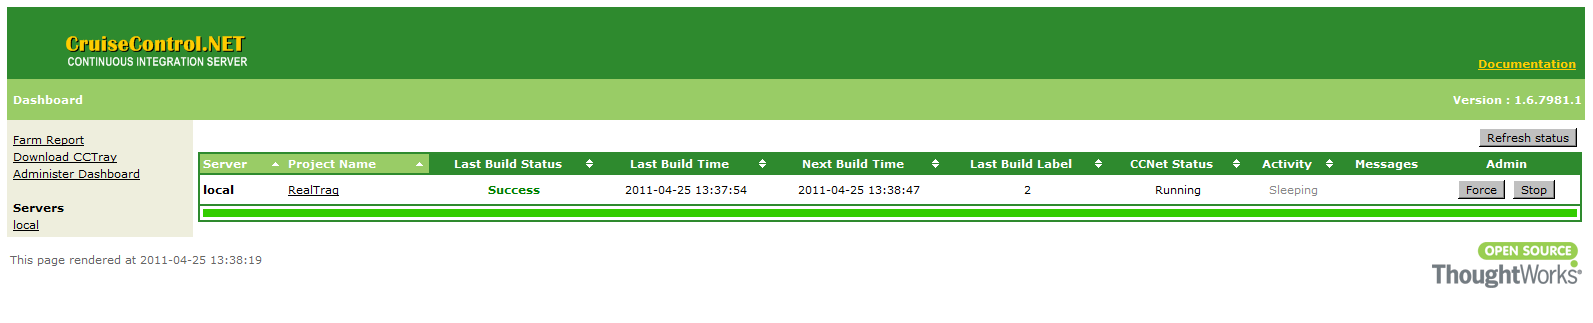
    1. Now, its time to check how it works. To do that, let's use the web console that was installed by Cruise Control.NET installer.
      • Click "Force" button to start building.
        During the build, the system will check the repository, get the latest sources and launch NANT with a default.build file that compiles the sources and deploy it to the web folder.


        • Successfull build is showing with the green color.
      Now, the process is automated. Every time when sources are changing in the repository, the Cruise Control.NET does all things and deploy builded project to the desired location.

      In addition, here is the reference to a great book "Expert .NET Delivery Using NAnt and CruiseControl.NET".

      The book really helped me to improve the process of continuous integration in my company.


      Friday, March 4, 2011

      Using ActiveX DLL in ASP.NET web applications under Windows Server 2003 64bit

      Today I got a request to install our old web application into the new server.
      It was a Windows 2003 Standard 64bit edition with SP2.

      In our project we are using aspSmartImage ActiveX dll component to convert incoming images into the format that suit for our needs.
      Everything was fine during our moving to the new server, but at the end I suddenly realized, that the aspSmartImage component is not working.
      Log said, there was a problem with loading the DLL:


      Retrieving the COM class factory for component with CLSID {28D7EF94-7F68-469E-B5B2-E7F08B62C294} failed due to the following error: 80040154


      Usually, when i got such message, I do the same thing :
      1. Start -> Run -> cmd
      2. regsvr32.exe aspSmartImage.dll
      Regsvr32 command registers COM component to the registry and .NET is able to access it as well as other applications.
      Since aspSmartImage is a COM library, i had strong hope that it will help.
      Unfortunately, for this time, nothing came out and I started looking for other ways.

      After few hours of searching I finally realized that i have 64 bit server and the old one was not. And that was a problem, because IIS 6.0 is running in 64bit mode by default. 
      IIS 6.0 does not allow mixing 64bit and 32bit web applications at the same time, so, its running everything as 64bit.
      When my web application was trying to access the DLL, it was unable to do that because that DLL is not 64bit.
      I realized that the only way to make it work is to make IIS 6.0 to work in 32 bit mode.

      Below is what I did to switch IIS 6.0 into 32bit mode  (found it at microsoft website):
      1. Start -> Run -> cmd
      2. cd %systemdrive%\Inetpub\AdminScripts
      3. cscript.exe adsutil.vbs set W3SVC/AppPools/Enable32BitAppOnWin64 1
      4. %SYSTEMROOT%\Microsoft.NET\Framework\v2.0.50727\aspnet_regiis.exe -i
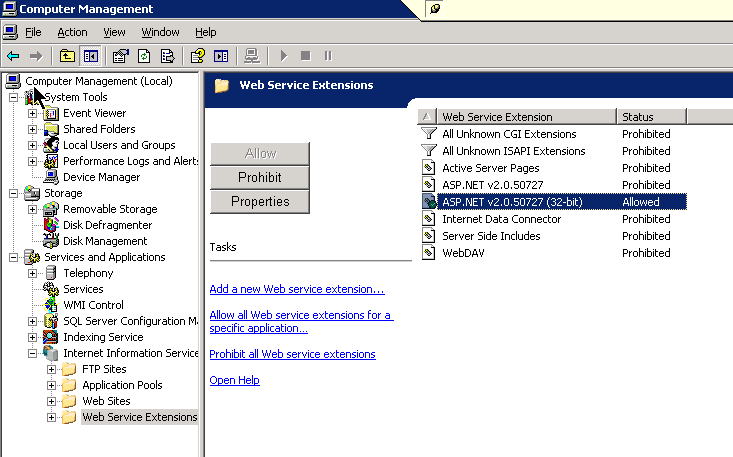
      5. Disabled 64bit ASP.NET web server extension and enabled the 32bit one in the IIS administration console


      After that I decided to restart web server for "just in case....". 
      And it started to work!

      So, watch out, the "Dll Hell" is still alive!

      P.S. 
      Actually, my aspSmartImage dll was also required to install msvbvm50.dll library for Microsoft Visual Basic virtual machine. 
      I had to install it from here
      After that it finally started working and I become the happiest man in the world :)


      Tuesday, February 22, 2011

      How to make Moq object to return different values on each invocation

      Today I stacked with the issue how to make Moq function to return different values when its calling by testing unit.

      Let's see on example:
      [Test]
      public void Value_should_be_assigned_on_property_value()
      {
      ///Arrange
      ...
      DrugAgreement agreement = new DrugAgreement();
      
      agreementsManager.Setup(f => f.Create()).Returns(agreement);
      
      ///Action
      testingUnit.AssignPropertyOnNewlyCreatedObject("propertyValue");
      
      ///Assert
      Assert.AreEqual("propertyValue", agreement.TestingProperty);
      }
      

      The code above expecting that the testing unit will create new instance of the object by calling Create, and change its TestingProperty value to propertyValue

      Now, let's implement the code for it:
      public DrugAgreement AssignPropertyOnNewlyCreatedObject(string newValue) {
          var obj = manager.Create();
          obj.TestingProperty = newValue;
          return obj;
      }
      

      The code above will work as expected.
      Now imagine that we mistakenly called Create for the second time after the property was set:
      public DrugAgreement AssignPropertyOnNewlyCreatedObject(string newValue) {
          var obj = manager.Create();
          obj.TestingProperty = newValue;
          obj = manager.Create();
          return obj;
      }
      

      For the first look, the test above should fail, but it is not!
      The test says that TestingProperty is equal to propertyValue, but the object is different. We called Create for the second time and expecting that manager is stateless and don't remember previously returned instance.
      The answer is simple - our mock manager returns the same instance of object every time when Create is calling.

      So, how to test this ?
      How to make sure that Create method is stateless and always returns different objects?

      Here is the corrected test:

      [Test]
      public void Value_should_be_assigned_on_property_value()
      {
          ///Arrange
          ...
          DrugAgreement agreement = new DrugAgreement();
      
          agreementsManager.Setup(f => f.Create()).Returns(agreement).Callback(()=> agreement = new DrugAgreement());
      
          ///Action
          testingUnit.AssignPropertyOnNewlyCreatedObject("propertyValue");
      
          ///Assert
          Assert.AreEqual("propertyValue", agreement.TestingProperty);
      }
      

      If we test our code now it will fail as it should.
      As you can see, the difference in the test is in calling Callback function by moq manager . That function instantiates new instance of DrugAgreement class after each call.

      In this case our manager is really stateless and always return different instances