About Me

Showing posts with label administrating. Show all posts

Tuesday, November 29, 2011

Batch file to delete files older than N days

Most of us remember times when we used MS-DOS commands, Norton Commander and staff like that.
Experience from that period of time is still usefull. From time to time i have to create bat files that does some boring things for me.
Its great to find something new in that area.
Today, thankfully to  guys from the stackoverflow, I found really easy way how to delete files older then N days.
I never know about forfiles command, its really awesome :

forfiles /P c:\DBbackup\CT\LogShipping\ /S /M *.* /D -1 /C "cmd /c del @path"

That simple command deletes (cmd /c del @path) all files (*.*) from a path (c:\DBbackup\CT\LogShipping\) that older than one day (/D -1)

In case if you want to remind a list of available DOS commands and find ones you never know, read a list of  "An A-Z Index of the Windows CMD command line"

P.S. In case if you get errors like "Invalid argument/option - '@path'" try to remove double quotes around a path if you have any.


Monday, April 25, 2011

How to configure CruiseControl.NET server for building and deploying ASP.NET applications with NANT

  1. Cruise Control is able to automatically build the code once it was changed in the SVN. To be able to do that, you need to install SVN client on the server.
    Download and install Collabnet subversion command-line client for windows. The installation is simple.
    • Create empty directory in any desired place. For instance, create empty directory "C:\Work\MyWebAppSources". Its not important where the directory will be, in the root of the hard drive or in the subdirectory.
      Now you need to get the sources of the web project from the svn repository. Cruise Control is checking for updates automatically, but for the first time, the folder with the sources should be prepared manually.
    • Select "Start" -> "Run" and type "Cmd" to launch the comand window.
    • Type "cd C:\Work\MyWebAppSources" to enter inside newly created directory.
    • Type "svn checkout http://beanstalkapp.com/svn/MyWebApp" to get the sources from your online svn repository
      In this example I'm using the Beanstalk - online svn repository for everyone. Instead of my url, use the url of your repository.
    • Enter login and password to access to your repository.
    • Wait until all files will be checked out from the svn server.
  2. Once Cruise Control download recent updates, it need to build the source code, create dlls and copy them to the web directory. Cruise Control does not do  that by itself. Instead, it using one of the numerous build applications. In this example I'm using NANT. To be used, NANT is needed to be configured on the server.
    • Download NANT package from the server
    • Unfortunately it does not have an installer, so you should do that manually. Open the package and extract bin subfolder into the any desired location. For instance, you may create subdirectory in your Programm Files folder and put the files from the package into that directory - c:\Program Files\Nant
    • To make Nant be visible by Cruise Control its needed to add the path to Nant binaries to the PATH Environment variable. Click "Start", right click on "Computer" and open Properties window.
    • Select "Advanced system settings" task. As result System Properties window will be appeared:
    • Click on "Environment Variables..." button
    • Select PATH variable and click "Edit..." button
    • Type ";c:\Program Files\Nant" at the very end of the line

    • Click "Ok" to close "Edit User Variable" console and close properties window by clicking "Ok" buttons.
    • To make sure that NANT exectutables can be found from any place, select "Start" -> "Run", type "cmd". Type "Nant" in the command window that opened. The result should be like the one on the image.
    • The "Build Failed" message is ok in this case. It means that NANT can't find any *.build file to build the application, but, the Nant itself is accessible from any location (from c:\windows\system32\ in my case)  and can be accessed by Cruise Control .NET too.
  1. Now we need to make sure that NANT can build our web application and deploy it to the desired place. Special .build file should be placed into the root of your source files (C:\Work\MyWebAppSources in this case). That file contains an xml-based script, telling NANT how to build and where to deploy the application. Below is an example of simple NANT script that builds web application and deploy all important files into the location where web directory of the website is.


    • Create a file and name it as default.build at the C:\Work\MyWebAppSources location.
    • Put the script inside and save it.
    • Click "Start" -> "Run". Enter "Cmd".
    • Enter "cd C:\Work\MyWebAppSources"
    • Type "Nant default.build"
    • Make sure that the script is working properly, build the sources and the files are copying to the desired place. The image below shows successfull state of the script's excecution.


  1. Now after we did everything manually its time to automate our process with Cruise Control.NET.
    • Download an installation package of Cruise Control.NET
    • Install the package.
      During the installation, make sure that following items are selected


      • Make sure that the package will be installed successfully
      • Cruise Control. NET contains of two parts - a web application that in charge of managing of the build process and the windows service. The windows service is in charge of checking for updates and initiate build process if new updates arrived.
        To make the windows service "Cruise Control. NET" working, its needed to change its configuration file.
      • Open directory where your service was installed. In my case its "C:\Program Files (x86)\CruiseControl.NET\server
      • Edit the ccnet.config (make sure its exactly that file, not the ccnet.exe.config)
      • Put the following configuration inside
    
      
        http://localhost/ccnet
        10
     
      svn
      http://beanstalkapp.com/svn/MyWebApp
      C:\Work\MyWebAppSources
      MySVNUsername
      MySVNPassword
      true


            nant.exe
            C:\Work\MyWebAppSources
            default.build


              C:\dev\ccnet\ccnet\build\ccnet.exe-results.xml


            log


      • Below is short description of items in the file that should be changed
        • TrunkUrl contains the url of the SVN repository with the sources
        • WorkingDirectory and Basedirectory elements is the directory where files are building and where default.build NANT file is
        • Username and password is the credentials to access the SVN repository

      • Now, its time to start the windows service. 
      • Click on "Start" -> "Run", enter "services.msc" to open the list of installed windows services
      • Find the "Cruise Control .NET" service and start it. 
      • By default, it configured to be launched manually every time when windows starts. You can change that property to "Automatic" and windows will start that service during each startup of the system.
    1. Now, its time to check how it works. To do that, let's use the web console that was installed by Cruise Control.NET installer.
      • Click "Force" button to start building.
        During the build, the system will check the repository, get the latest sources and launch NANT with a default.build file that compiles the sources and deploy it to the web folder.


        • Successfull build is showing with the green color.
      Now, the process is automated. Every time when sources are changing in the repository, the Cruise Control.NET does all things and deploy builded project to the desired location.

      In addition, here is the reference to a great book "Expert .NET Delivery Using NAnt and CruiseControl.NET".

      The book really helped me to improve the process of continuous integration in my company.


      Friday, March 4, 2011

      Using ActiveX DLL in ASP.NET web applications under Windows Server 2003 64bit

      Today I got a request to install our old web application into the new server.
      It was a Windows 2003 Standard 64bit edition with SP2.

      In our project we are using aspSmartImage ActiveX dll component to convert incoming images into the format that suit for our needs.
      Everything was fine during our moving to the new server, but at the end I suddenly realized, that the aspSmartImage component is not working.
      Log said, there was a problem with loading the DLL:


      Retrieving the COM class factory for component with CLSID {28D7EF94-7F68-469E-B5B2-E7F08B62C294} failed due to the following error: 80040154


      Usually, when i got such message, I do the same thing :
      1. Start -> Run -> cmd
      2. regsvr32.exe aspSmartImage.dll
      Regsvr32 command registers COM component to the registry and .NET is able to access it as well as other applications.
      Since aspSmartImage is a COM library, i had strong hope that it will help.
      Unfortunately, for this time, nothing came out and I started looking for other ways.

      After few hours of searching I finally realized that i have 64 bit server and the old one was not. And that was a problem, because IIS 6.0 is running in 64bit mode by default. 
      IIS 6.0 does not allow mixing 64bit and 32bit web applications at the same time, so, its running everything as 64bit.
      When my web application was trying to access the DLL, it was unable to do that because that DLL is not 64bit.
      I realized that the only way to make it work is to make IIS 6.0 to work in 32 bit mode.

      Below is what I did to switch IIS 6.0 into 32bit mode  (found it at microsoft website):
      1. Start -> Run -> cmd
      2. cd %systemdrive%\Inetpub\AdminScripts
      3. cscript.exe adsutil.vbs set W3SVC/AppPools/Enable32BitAppOnWin64 1
      4. %SYSTEMROOT%\Microsoft.NET\Framework\v2.0.50727\aspnet_regiis.exe -i
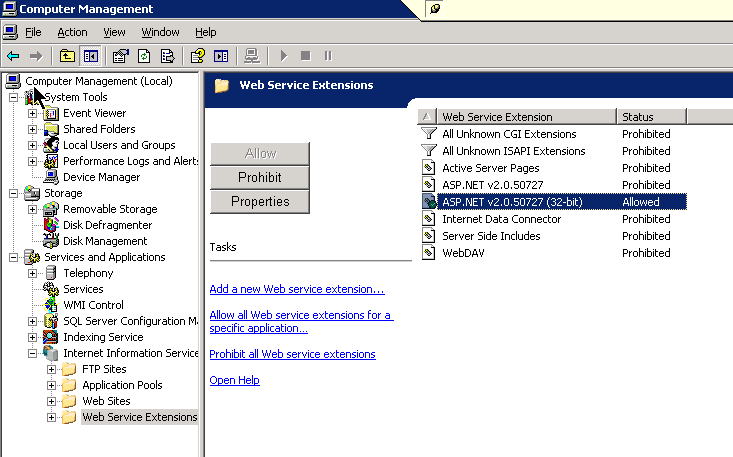
      5. Disabled 64bit ASP.NET web server extension and enabled the 32bit one in the IIS administration console


      After that I decided to restart web server for "just in case....". 
      And it started to work!

      So, watch out, the "Dll Hell" is still alive!

      P.S. 
      Actually, my aspSmartImage dll was also required to install msvbvm50.dll library for Microsoft Visual Basic virtual machine. 
      I had to install it from here
      After that it finally started working and I become the happiest man in the world :)