
- Cruise Control is able to automatically build the code once it was changed in the SVN. To be able to do that, you need to install SVN client on the server.
Download and install Collabnet subversion command-line client for windows. The installation is simple. - Create empty directory in any desired place. For instance, create empty directory "C:\Work\MyWebAppSources". Its not important where the directory will be, in the root of the hard drive or in the subdirectory.
Now you need to get the sources of the web project from the svn repository. Cruise Control is checking for updates automatically, but for the first time, the folder with the sources should be prepared manually. - Select "Start" -> "Run" and type "Cmd" to launch the comand window.
- Type "cd C:\Work\MyWebAppSources" to enter inside newly created directory.
- Type "svn checkout http://beanstalkapp.com/svn/MyWebApp" to get the sources from your online svn repository
In this example I'm using the Beanstalk - online svn repository for everyone. Instead of my url, use the url of your repository. - Enter login and password to access to your repository.
- Wait until all files will be checked out from the svn server.
- Once Cruise Control download recent updates, it need to build the source code, create dlls and copy them to the web directory. Cruise Control does not do that by itself. Instead, it using one of the numerous build applications. In this example I'm using NANT. To be used, NANT is needed to be configured on the server.
- Download NANT package from the server
- Unfortunately it does not have an installer, so you should do that manually. Open the package and extract bin subfolder into the any desired location. For instance, you may create subdirectory in your Programm Files folder and put the files from the package into that directory - c:\Program Files\Nant
- To make Nant be visible by Cruise Control its needed to add the path to Nant binaries to the PATH Environment variable. Click "Start", right click on "Computer" and open Properties window.
- Select "Advanced system settings" task. As result System Properties window will be appeared:
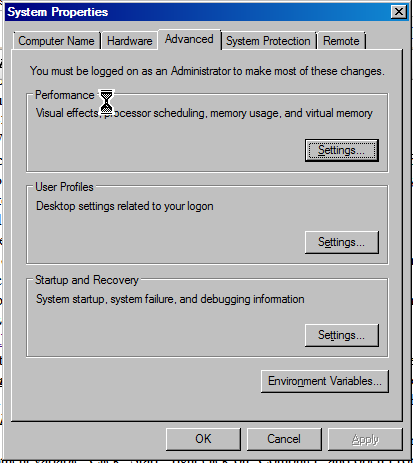
- Click on "Environment Variables..." button
- Select PATH variable and click "Edit..." button
- Type ";c:\Program Files\Nant" at the very end of the line

- Click "Ok" to close "Edit User Variable" console and close properties window by clicking "Ok" buttons.
- To make sure that NANT exectutables can be found from any place, select "Start" -> "Run", type "cmd". Type "Nant" in the command window that opened. The result should be like the one on the image.
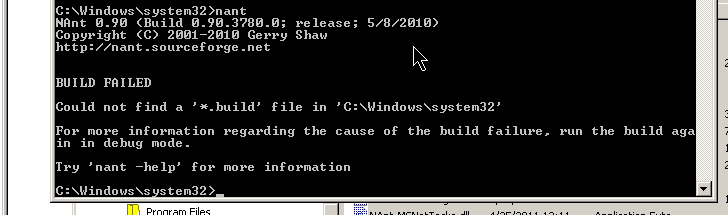
- The "Build Failed" message is ok in this case. It means that NANT can't find any *.build file to build the application, but, the Nant itself is accessible from any location (from c:\windows\system32\ in my case) and can be accessed by Cruise Control .NET too.
- Now we need to make sure that NANT can build our web application and deploy it to the desired place. Special .build file should be placed into the root of your source files (C:\Work\MyWebAppSources in this case). That file contains an xml-based script, telling NANT how to build and where to deploy the application. Below is an example of simple NANT script that builds web application and deploy all important files into the location where web directory of the website is.
- Create a file and name it as default.build at the C:\Work\MyWebAppSources location.
- Put the script inside and save it.
- Click "Start" -> "Run". Enter "Cmd".
- Enter "cd C:\Work\MyWebAppSources"
- Type "Nant default.build"
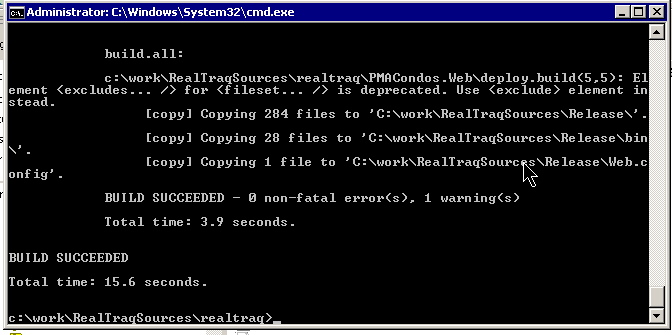
- Make sure that the script is working properly, build the sources and the files are copying to the desired place. The image below shows successfull state of the script's excecution.
- Now after we did everything manually its time to automate our process with Cruise Control.NET.
- Download an installation package of Cruise Control.NET
- Install the package.
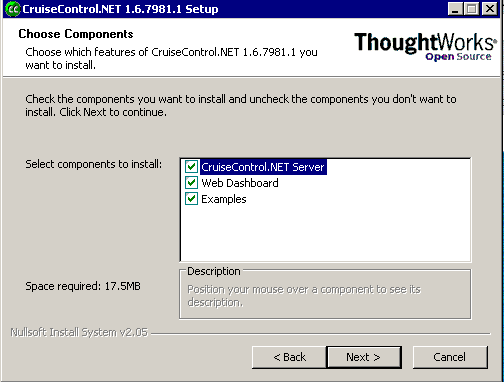
During the installation, make sure that following items are selected

- Make sure that the package will be installed successfully
- Cruise Control. NET contains of two parts - a web application that in charge of managing of the build process and the windows service. The windows service is in charge of checking for updates and initiate build process if new updates arrived.
To make the windows service "Cruise Control. NET" working, its needed to change its configuration file. - Open directory where your service was installed. In my case its "C:\Program Files (x86)\CruiseControl.NET\server"
- Edit the ccnet.config (make sure its exactly that file, not the ccnet.exe.config)
- Put the following configuration inside
    http://localhost/ccnet
    10

  svn
  http://beanstalkapp.com/svn/MyWebApp
  C:\Work\MyWebAppSources
  MySVNUsername
  MySVNPassword
  true


        nant.exe
        C:\Work\MyWebAppSources
        default.build


          C:\dev\ccnet\ccnet\build\ccnet.exe-results.xml


        log
- Below is short description of items in the file that should be changed
- TrunkUrl contains the url of the SVN repository with the sources
- WorkingDirectory and Basedirectory elements is the directory where files are building and where default.build NANT file is
- Username and password is the credentials to access the SVN repository
- Now, its time to start the windows service.
- Click on "Start" -> "Run", enter "services.msc" to open the list of installed windows services
- Find the "Cruise Control .NET" service and start it.
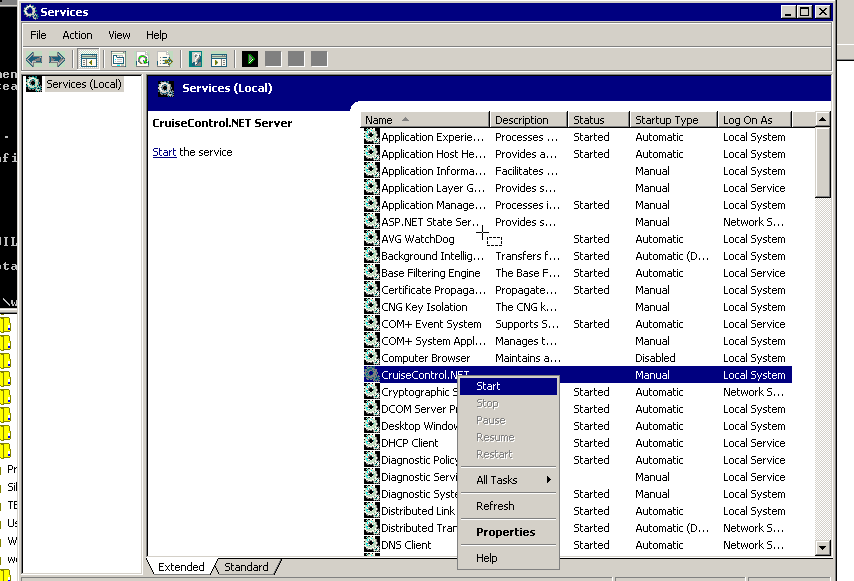
- By default, it configured to be launched manually every time when windows starts. You can change that property to "Automatic" and windows will start that service during each startup of the system.
- Now, its time to check how it works. To do that, let's use the web console that was installed by Cruise Control.NET installer.

- Click "Force" button to start building.
During the build, the system will check the repository, get the latest sources and launch NANT with a default.build file that compiles the sources and deploy it to the web folder.
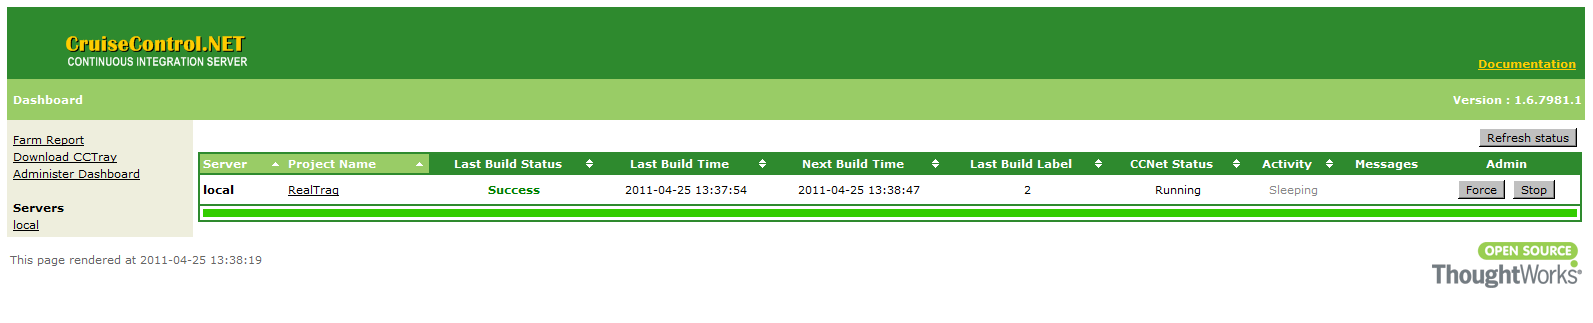
- Successfull build is showing with the green color.
Now, the process is automated. Every time when sources are changing in the repository, the Cruise Control.NET does all things and deploy builded project to the desired location.
In addition, here is the reference to a great book "Expert .NET Delivery Using NAnt and CruiseControl.NET".
Great !!!!
ReplyDeletevery nicely explained.
ReplyDeletethank you